

When new users begin utilizing your software, the first documentation they’ll probably look at will be the README file.
This text serves as an introduction to your project, explaining its purpose and providing instructions on how to use it.
In other words, the README is a guide that helps users navigate your software.
However, for a README to be helpful, there are certain indispensable sections this document should contain.
For instance, imagine if you omitted the installation instructions—how would developers even start using the software?
That’s why we’ve compiled this article—so you have a comprehensive list of elements your README should contain.
Project Title
The first thing users should see after opening your README file is the project title. This is the name of your project; a few words describing your project in one sentence.
Ideally, your project title should be self-explanatory so users immediately get an idea of what the project is about. For example, look at this README title:
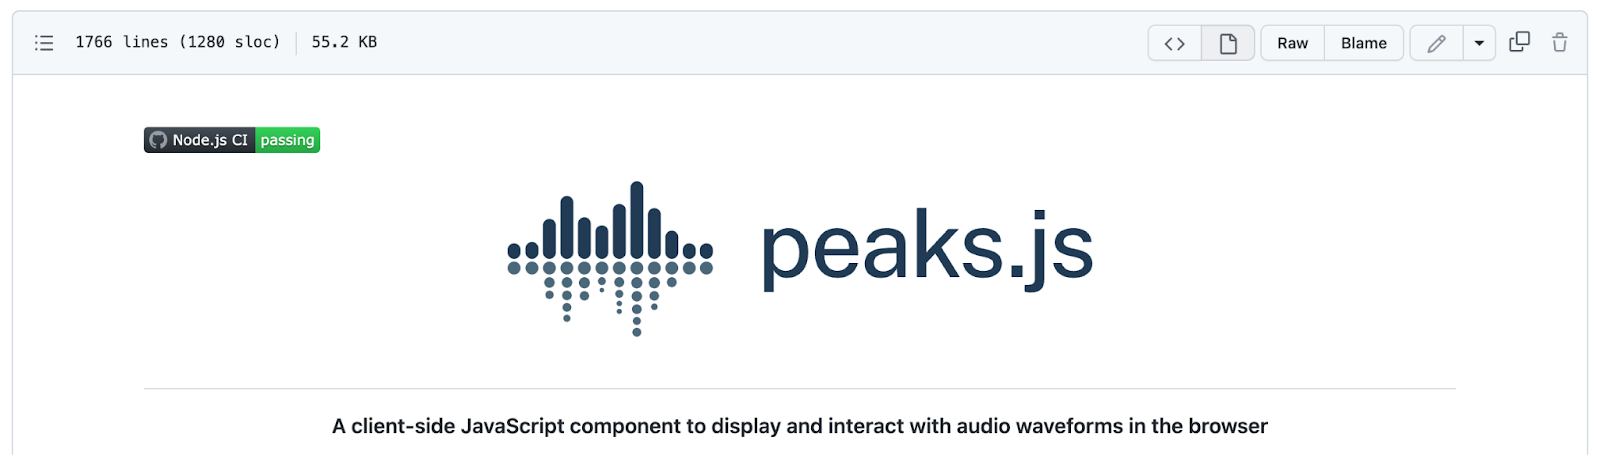
Even though the project’s function isn’t apparent from the title alone, the .js ending still indicates it’s a JavaScript build.
Furthermore, the soundwave icon on the left implies a musical association. Users can infer it’s audio software.
In addition, the subtitle further clarifies the software’s purpose. The smaller text right underneath explains everything the main title hinted at.
Project Description
The project title should be immediately followed by the project description.
This text is essentially an extended version of the heading, further elaborating on the project’s goals, functions, and usage.
A project description is essentially a short summary of the entire software.
If readers want a quick overview of the project without reading the whole README, the project description is where to look.
Here’s an excellent example of a project description:

Informative, humorous, and short, this description succinctly summarizes the project’s motivation and purpose, including all essential details. These are all the project’s main points.
Furthermore, the description is friendly and engaging—the reader likely laughed. With this description, users will immediately connect with the project’s aims.
Table of Contents
Depending on the project’s complexity, READMEs can often be pretty lengthy.
Since long documents are harder to navigate, readers might overlook the information they need, or have trouble finding it.
However, you can mitigate these issues with one simple element: a table of contents.
With an interactive table of contents, users can quickly find the information they’re looking for and immediately jump to those segments. They’ll read the README much more efficiently.
Here’s a sample table of contents:

This table of contents also includes sub-headings, creating a clean and organized structure users can easily follow, so navigating the README shouldn’t be a problem.
Technologies Used
Although README files seldom include this element, listing the technologies used in your project is hugely helpful.
Having a record of these technologies considerably facilitates launching the project in the future.
Library versions change, and a seemingly insignificant alteration might just cause issues later down the line.
However, you can avoid these mishaps by noting the exact technologies used, as users will know precisely which platforms you built the software with.
For example, here’s how WebApp was made:
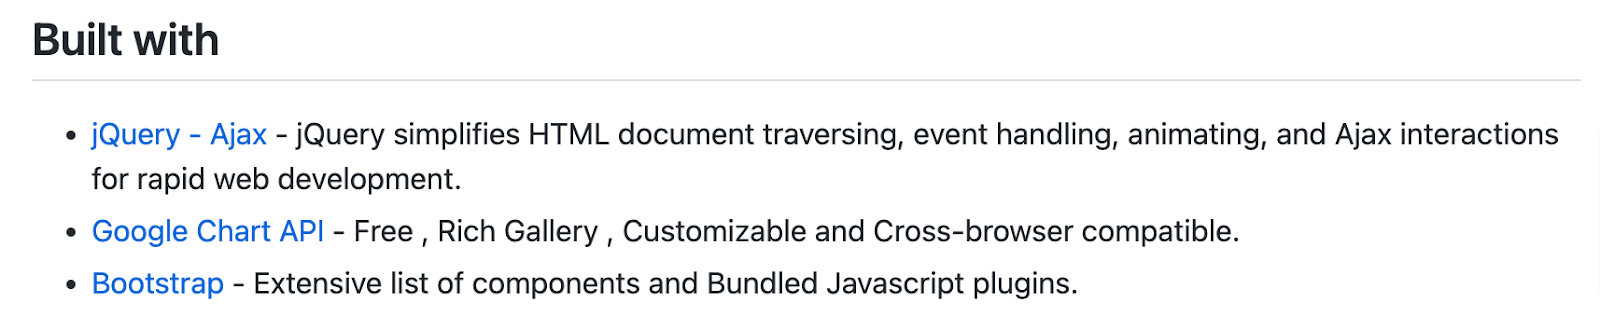
With this technology list, readers will know exactly how the software came to be and what components make up its codebase.
Furthermore, each item is hyperlinked, so users can easily research the technologies further if they want more details.
Requirements
A README’s chief purpose is to make interaction with your project easier.
Users are more inclined to utilize your software if it’s well-documented, as they can then access supplementary materials that guide them.
Of these instructions, software requirements are perhaps the most essential.
Without a list of requirements, users can’t even launch the project; this data is crucial for a smooth start.
Have a look at Pa11y’s requirements:

The README offers detailed information for different operating systems, covering all possible options.
Furthermore, the document even offers alternative solutions if the user can’t run the newest Node.js version (Pa11y’s chief requirement).
The requirement overview is extremely thorough, taking into consideration all user environments, and guarantees an easy software launch—and that’s exactly what to strive for.
Installation Instructions
After verifying the requirements are fulfilled, the next step is installing the software, so users can finally get their hands on the code.
Generally speaking, installation instructions should be straightforward—users shouldn’t lose time on installation.
Proclaim is a good example:

The README provides concise yet comprehensive instructions for several installation methods.
This text covers both the server and client sides and even offers two choices for the latter. As such, installing the software should be simple.
If you have many installation methods, it’s better to hyperlink the instructions to additional documents instead of prolonging the README.
That was PowerShell’s approach:

With this interactive table of installation instructions, the README remains short yet informative.
Usage Instructions
Once your users have installed the software, it’s time to teach them how to use it. That way, they can begin utilizing your product as soon as possible.
The usage instructions typically include brief descriptions of the software’s capabilities, supplemented by code snippets.
That way, users know exactly what actions to perform to achieve their desired functionality.
For example, here’s an excerpt from the usage instructions by Closures:

Closures’ capabilities are outlined in a systematic list, with a code sample accompanying each feature.
With this helpful overview, users have specific guidelines for using the software.
They won’t waste time researching how to do so independently; instead, all the essential information is clearly laid out.
Documentation
Although it should be thorough, your README shouldn’t be too long, as users might lose interest. So, how do you balance these two facets?
Try including a hyperlinked documentation section. That way, users can navigate to additional documentation, but your README stays concise.
Here’s a good example:

Instead of listing all these documents, they’re helpfully linked, keeping the README informative yet brief.
An elegant way to interlink your README with other documentation is by utilizing a documentation platform. That way, you host the two categories in the same space.
Here’s how that works with our own platform, Archbee:

Look at the left-hand table of contents—that’s all the documentation you can easily interlink with your README, all in the same location.
Visuals
Humans are visual learners, and information is much easier to retain if presented through images, as opposed to solely text.
Why not apply this insight to your README?
If your README contains visuals, it’s almost guaranteed that readers will easily understand the content of your document.
For example, these visuals can demonstrate the project’s features so that users can see exactly how the software operates.
Flutter did this very well:
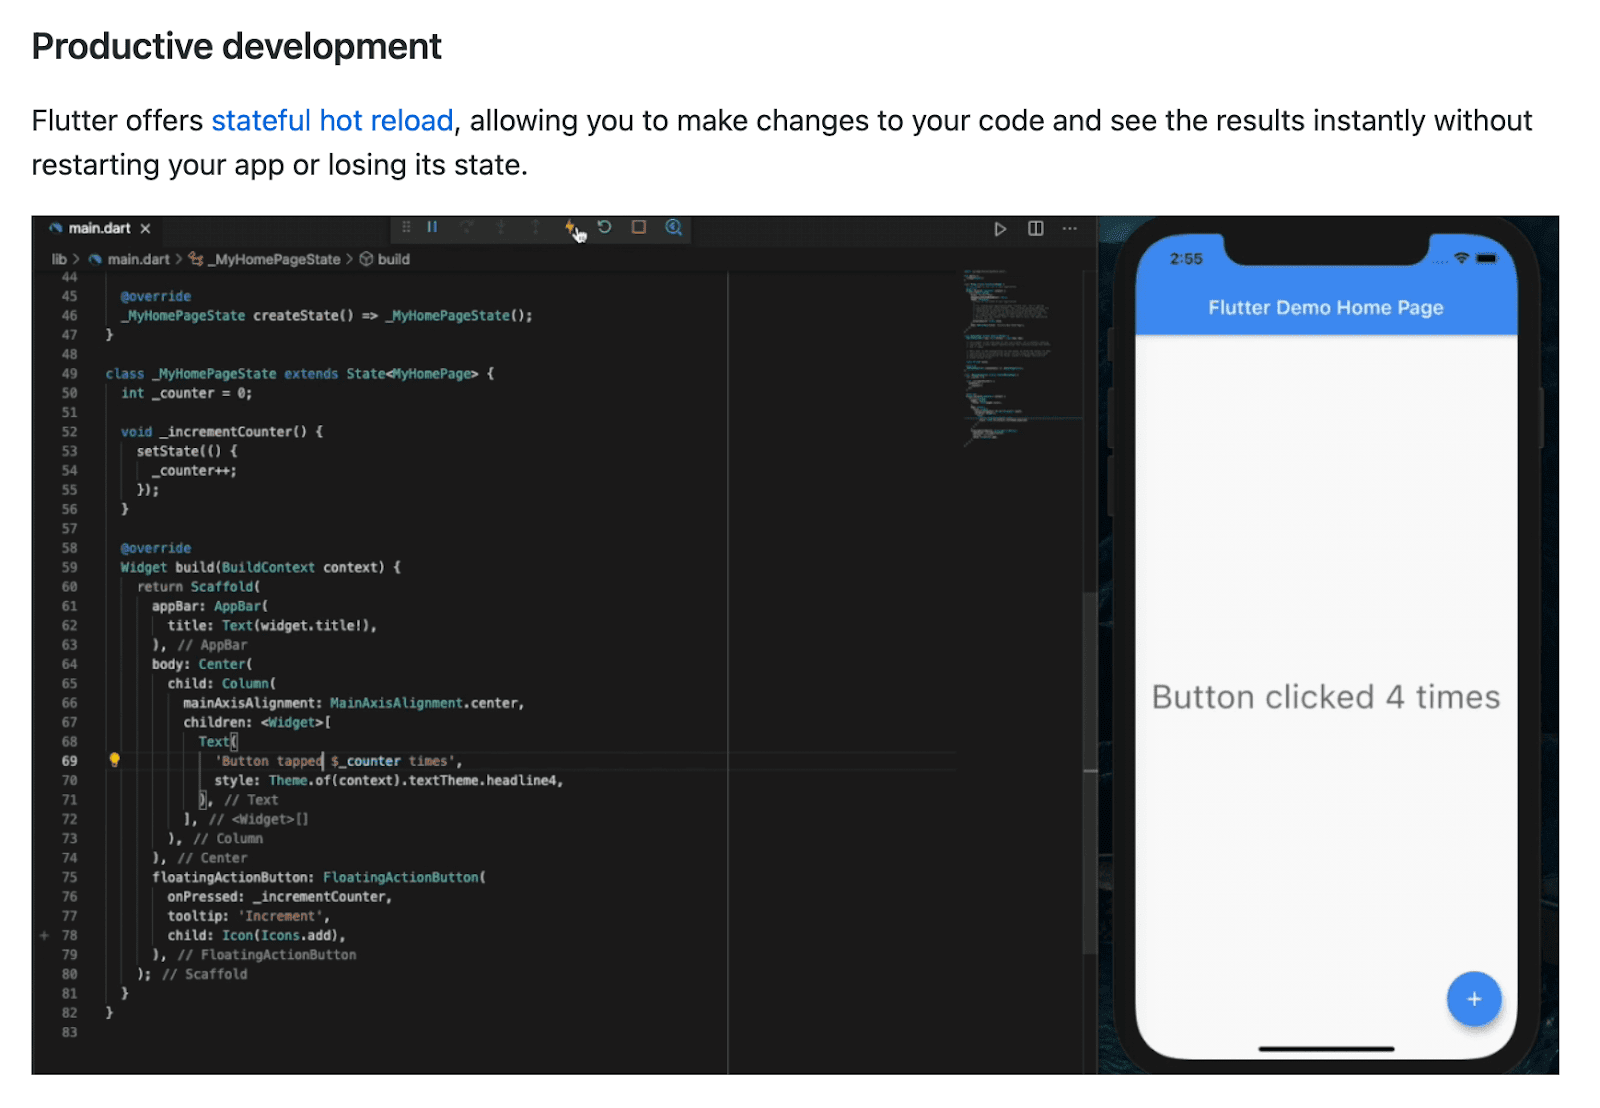
Flutter features hot reload, which allows users to see the outcomes of their code changes instantly. As soon as they edit the code, they can see the results on an accompanying screen.
By providing a screenshot of this feature, Flutter described it better than words ever could.
Support Information
Your users will occasionally encounter problems, no matter how hard you’ve worked on your project. When that happens, you need to provide a way to assist them.
It doesn’t matter whether it’s a Slack channel or a Discord server—your README should note where users should turn to receive support.
Here’s ESLint’s solution:

Short and simple yet informative—users know exactly how to contact ESLint with their questions.
Although GitHub discussions and Discord servers are popular support solutions, there are a few other options.
ReLaXed took the following approach:

Other possible support platforms include GitHub issues, StackOverflow and Reddit.
You can choose whatever option suits your project most—just ensure the support information is in the README.
Project Roadmap
This element isn’t a mandatory README section, but it certainly helps elevate your document.
By including a product roadmap, you communicate your project’s past and future progress.
Readers can consult the roadmap to see how your software has grown and what features they can expect in the future.
This section provides a helpful, concise overview of your project’s progression. The Monica roadmap is a good example:

In this text, you can find what Monica has accomplished so far, what they’re working on currently, and what’s next on the list.
Providing the project roadmap gives readers insight into your software’s direction. Users will know what to anticipate and can look forward to the upcoming functionalities.
Project Status
Consistently and continuously working on a software project isn’t impossible, but it’s certainly challenging.
For example, if you’re working on multiple software, it’s advisable to focus on each software individually rather than tackle both simultaneously.
Breaks in software development aren’t unusual, which is why it’s crucial to always indicate the current status of your project.
Generally speaking, your project can be assigned one of the following statuses:
- Completed
- Active/In development
- On hold
- Abandoned
Whatever your situation, ensure your README clearly communicates the project status.
For example, here’s how isomorphic-git explained their project status:

Although their situation is more complex, the state of affairs is still effectively presented, and every reader will be fully informed about the project status.
Contribution Guidelines
If you’d like your software to be open-source and want users to help develop the project further, it’s a good idea to list some basic contribution guidelines.
That way, all your contributors will know precisely how to assist your project. Furthermore, you’ll create a consistent, standardized process.
There won’t be a mish-mash of issues and pull requests; there will just be one set system.
For example, these are Joblint’s contribution guidelines:

These straightforward instructions are brief, but they’re everything contributors need to add to the project.
If your contribution guidelines are more extensive, consider creating a separate document and linking to it from your README.
GitHub hosts a specific document type for such situations: a CONTRIBUTINGfile.
Acknowledgments
Software is rarely built by one person alone. Chances are, you aren’t the sole author of your project, and instead you had some help along the way.
If that is the case, it’s respectful to acknowledge those who helped your project come to life.
Imagine if they hadn’t been there to assist you—who knows what the software would look like now?
A README is a perfect opportunity to give credit where it’s due and let contributors know they’re appreciated.
Here’s how Nock wrote their acknowledgments:

Not only did Nock publicly list every contributor, they even uploaded photos for each patron.
Such effort shows the project’s appreciation for their assistance, and they clearly want to showcase their work as best they can.
License Information
Coding is creative work, and creative work is, by default, protected by copyright.
However, it’s in your best interest to expose your code to other developers, so they can contribute to the project and help develop it.
The easiest way to balance this is to obtain an open-source license—a document that retains your copyright yet allows others to develop your code.
You should then include this license in your README so users are aware of the legal specifics regarding your software.
The main purpose of this part of the documentation is to communicate what users can and cannot do with your software project.
For example, here’s node-sqlite3’s license:

This screenshot certifies node-sqlite3’s license compliance, and readers can see all of the license details.
Conclusion
For a README to be helpful, there are certain mandatory pieces of information the document should contain.
A noticeable, easily understandable project title at the top of the document is a must.
However, with no accompanying description to explain what the title signifies, your readers are likely to have a difficult time understanding it.
Consider composing a README checklist of necessary elements and comparing your current document with this requirement list.
You're good to go if you can check off most of the items there.
Otherwise, it might be prudent to update the README—your readers will definitely thank you.


